|
|
|
![]()
ShadowLight Inc's Web Page Control Panel
|
FractalGen's Home Page
All images and sample screens (c) ShadowLight, Inc. 2002
Welcome to FractalGen's Homepage
What is FractalGen?
- FractalGen was created to generate fractal type images to use for mapping to 3D objects in 3D software such as LightWave 3D, 3D Studio Max, WaveFront, Maya, and the like. It is not a 3D rendering package in and of itself (although it does have a 3D preview of sorts).
- FractalGen defines a virtual landscape 512 x 512 units from 0 to 256 units in height. The program then paints three different maps per project to use on a landscape type object in your 3D package.
- Since all maps are operated on simultaneously, they all perfectly match each other size wise.
NOTE: Creating the 3D object is not discussed here since it is assumed the reader will be familiar with 3D objects for his/her own package. However, the Lightwave 3D objects and one sample scene are included with the install files for reference.
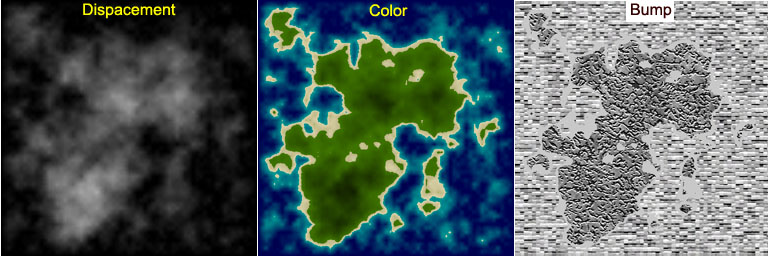
- The three maps created are:
- Displacement - grayscale image to displace the landscape object
- Color - Add to the color channel to color the landscape
- Bump - Add to the bump channel to and bumps along the surface.
Three matched example maps are shown here side by side (reduced 1/2 size):
- The map data and all three images are saved as a project and can be reloaded and edited at any time.
System Requirements
- Windows NT 4.0 SP6 or Windows 2000
- Windows 95, 95A, 95B, 98 & 98SE were not directly tested, but should work fine. You may download and install the Win 2000 version and try for these operating systems at your own risk...
- Windows ME was not tested and is not recommended to try any downloads
- Pentium 200 MMX (minimum)
- 24 Bit Color Display settings
- 1024 x 768 Resolution minimum recommended
- 64 MB RAM
Recommended:
- Pentium II 550 or greater
- 24 Bit Color Display, 17" Monitor
- 1280 x 1024 Resolution
- 128 MB RAM
Note: Not all features of FractalGen are discussed in the paragraphs that follow below as some of them are in developement or are self-explanatory. This page lists the highlighted functions.
QUICKSTART HELP:
FractalGen has a built in "QuickStart" function. Check the QuickStart Help box on the splash screen. This will guide you through the basic operations of using FractalGen to create your first landscape using a pop up window with directions.
USING THE PROGRAM TO CREATE LANDSCAPES
1. Generating a FractalGen Landscape
Main Screen:
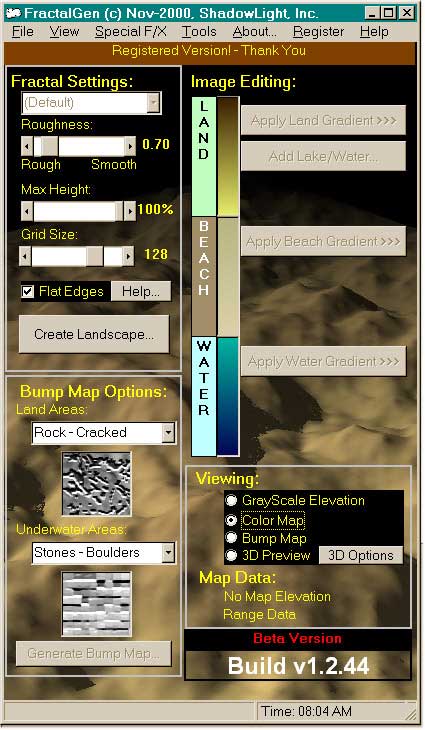
Starting in the upper right hand side of the form with Fractal Settings:
FractalGen creates a fractal landscape based on random numbers and several inputs user supplied. These are:
Input Name Values Description Roughness
0.5 - 2.5
This value interpolates the changes between grid points. LOW values are ROUGHER.
Max Height |
10 - 100% |
Sets the overall scale of the landscape (100% = 256 units) |
Grid Size |
32, 64, 128, 256 |
Sets the number of "control points". HIGHER numbers make the landscape have less "peaks." |
Flat Edges |
ON / OFF |
Flat Edges forces zero elevation changes at the map edges. This is very useful for island type landscapes. |
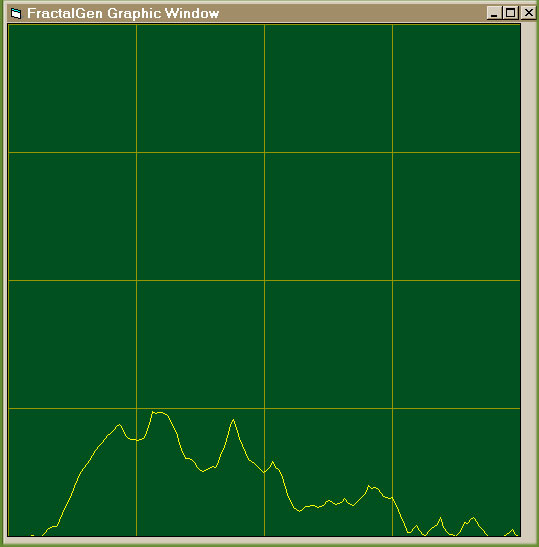
Before you create a landscape, the graphic window to the right of the main screen will show you a relative graph of the grids and a sample cross section of a landscape. The height of the yellow lines are relative, meaning, the generated landscape can be slightly rougher or smoother than the preview (the beauty of randomness!).
Preview Graphic Window:
Note here that the "Grid Size" and "Roughness" are not entirely independent. That is, decreasing the Grid Size and lessening the Roughness will be basically the same effect.
Create Landscape Button
Takes all the above information along with a few random numbers and generates the 3D landscape. At this point, a small preview window opens. You can either accept the fractal generated or choose "Generate Another". This lets you preview the basic shape to get a basic shape of what you are looking for.
Land Preview:
2. Applying Color Gradients
Now, the upper right hand side of the form labeled Image Editing:
Click any of the color bars to bring up the color picker menu:
The color gradient bars are located on the right side of the main screen. Three basic ranges are used: land, beach, water. Click on any of these labels or the color bars to open the Color Picker screen.
Color Picker Screen:
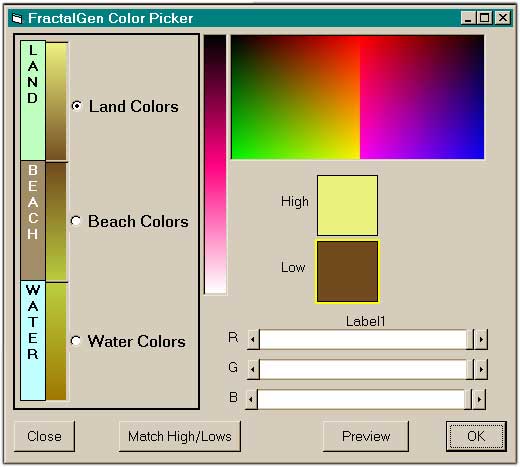
This screen operates much the same as any other color picker you may have used. Click in the color box to pick a color. The band of color to the left of this displays all ranges of this color from dark to light. Click a color in here to refine your first choice in the large box, if desired. You can further refine this by sliding the color bars left or right.
In the Color Picker screen, select which colors you wish to edit via the radio buttons by the labels. Two colors are used for each range: high, low. All these colors are editable at run time. FractalGen also loads the last color scheme saved with the last project. HINT: If you wish to paint land only with more colors, think of the beach and water ranges as just Low Land. Click on "Match High/Lows" to overlap the high color on Water with the low color on Beach. This can create some interesting effects and will make the land look layered from bottom to top. The "Match High/Lows" was used and is showing the color bands in the picture above (brown - green - brown - yellow)
OK Button -- Copy these colors to the main screen for use on the landscape.
The Apply buttons are greyed out as shown in the picture above, but this will be explained a little later.
3. Using the Bump Map Options
Bump maps really only take effect in FractalGen when the Lake/Water feature is used. (see next Section for more details). Two maps can be chosen in the list boxes, one for land areas, one for underwater areas. This effect is basic but does create some interesting combinations. There are eight bump maps to choose from (more in future releases!).
NOTE: FractalGen was not designed to be then "end all" product for landscape renders. This is not the end of bump maps by any means! More maps/effects can be added via your 3D package for even better output. This area is left up to the user since we assume you will be familiar with displacement, bump and color mapping if you are reading this!
4. Water (Lake) Screen
Under the Tools menu, if you select "Add Water", then another menu pops up;
Water/Lake Menu:

This feature paints your landscape as if part of it is underwater. In test renders, when a water plane is located at the "beach" level and rendered with bumped waves, reflection, transparency, and refraction, very good results can be obtained with little effort!
- To use, set the max lake elevation (default is 50). This defines how high up on the map the mid water level is.
- Click on preview to see a quick and dirty version of the output on the graphics screen. You can select the preview resolution using the slider bar (recommend HIGH for faster PC's, 500+ MHz to get a better overall idea of the output). You can also keep changing the lake elevation (or beach width value) and preview until you are satisfied with the way the "islands" or "lakes" look.
Smooth Beach
This paints the bump map areas defined as Beach with a smooth color. This lets the "sand" look smooth during the render phase of your project. Don't forget, the bump map will match perfectly with the color and displacement maps defined in previous steps.
a sample Water Preview

Click OK to apply the color gradients to your landscape. FractalGen now paints the landscape with your gradient colors. In the example image above, the color map looks like:
Color Map Image:
5. Release 1.4 or higher Functions
A. Save Hi-Res Map
This functions regenerates the color map in 1024 x 1024 size and saves to a default file equal to your project name plus the suffix "HRCLR". This procedure can take some time depending on your processor speed. We recommend setting up your complete scene, then reloading your project into FractalGen, and using the High Res output to "upgrade" the image quality for use in your 3D program final rendering. The hi res color map will give a much smoother look to the colors and transitions of your landscape, especially if your camera view of the land is relatively close up.
EX. Project name is: project01
Hi Res Map name: project01HRCLR.bmp
B. Invert Landscape
This function simply reverses the height data (low becomes high, high becomes low). The color map and bump map are not effected unless reapplied using one of the paint buttons or lake procedure.
6. Release 2.0 or higher Functions
C. Flatten Area
This function will create a "FLAT AREA" roughly square shaped at the screen location you specify. The program will smooth the surrounding land to give a natural look. This function is useful to create flat spots where you may want to add buildings or roads or even a small town in your 3D package layout.
D. Import
This function loads an image from your hard disk and creates height data for the image. Data can then be operated on by any of the other functions. The default size is 512 x 512. Some limitations will be experienced with this in that:
- images with either or both dimensions greater than this will be truncated to the 512 size
- Image with either of both dimensions smaller than this will be filled with black up to the 512 dimension.
- However, the recommended procedure for importing mismatched sized images is
- load your image into a paint program (PhotoShop, PaintShop Pro, etc.)
- resize your image to 512 X 512 (turn off Keep Proportions if your image is not square to begin with)
- change to gray scale image
- resave as 8 bit TIFF, IFF, or TGA file
- run FractalGen and import the newly saved file.
** It will load and operate on "full color" 24 bit images, however, and you may get unexpected (and sometimes COOL and unbelievable!) results.
F. Special F/X Menu
1. Add Erosion
This function is not yet in developement but is planned to add natural looking water erosion to the height data.
2. Add River
This function is being developed now for version 2.0+ and is planned to cut a natural looking riverbed through the landscape, then smooth the edges appropriately. It can also be used to make roads or other paths.
G. JPEG Saver
This will greatly save disk space by elimating the BMP save format.
7. Example Use
Click here to see an example of using of FractalGen's output images in a 3D application (LightWave 3D).
Other ShadowLight, Inc. Web Pages:
Back to ShadowLight, Inc.'s Home Page